Thursday, December 23, 2010

Christmas Cards

I made these cards for my hubby to give to his buddys at the drving range where he spends a lot of his time giving golf lessons and repairing clubs.


Sorry the picture is sideways! 

Best wishes to everyone for a very Merry Christmas and Happy Stampin' New Year!
Love n real big hugs, Julia
 

Tuesday, December 14, 2010

Christmas Candy

I made up some bags of Almond Roca for my co-workers in my Department.  I got the recipe from my Twin Sis' Judy ~ it's out of the Betty Crocker Red Checked Recipe Book.  SoooOOO yummy!  I used Old Olive CS sponged with Chocolate Chip and the tag is from the Tags til Christmas Stamp Set.  I used Very Vanilla CS for the base of the tag and stamped with Old Olive Ink and the Chocolate Chip Marker I used to color the pine cone.  The topper is cut with the Top Note Die and sponged everything with Chocolate Chip Ink.

One bag of candy I put into a little purse I had made quite some time ago ~ it's on my blog somewhere if you want to "hunt it down"...LOL!!!  Sure hope they like their little treats!  Thanks for making me a copy of your recipe Judy ~ too good!!!

Monday, December 13, 2010

Tina's B-Day Card

Yesterday was my friend Tina's Birthday.  I made a card for her like the one I did for my Step-Daughter-in-law on 11/28 (see posting below).  The instructions I got from StampingSchool.com.  I know she liked it, she sent me a text message to let me know! 

This one I used more pearls on and the Soft Suede strip across the middle I punched with the Dotted Scallop Ribbon Border Punch. 

Sunday, December 5, 2010

Theresa's Birthday Card

Here's the card I made for Bob's new-found daughter.  It's the first Birthday card she's ever received from her Dad ~ after 53 years!  Hope she likes it?

I used the cupcake from the stamp set Got Treats.  I used Blushing Bride CS for the base card and ran a piece of Poppy Parade CS through the Square Lattice Embossing Folder.  I used the Mat Pack to punch the corner pattern by the cupcake.  Basic Pearl Jewels and Blushing Bride Poly Ribbon for accents.  The Birthday Wishes is from the Water Color Trio Stamp Set.  The patterned paper is from In Colors Pattern Stack.  Oval Punch and Scallop Oval Punch around the sentiment and a couple more Basic Pearl Jewels. A little sponging and viola ~ Theresa's first Birthday Card from us!  Happy Birthday Daughter!

Sunday, November 28, 2010

Pick-up Happy Birthday

I copied my Sis' Judy's Pick-Up card to make this Birthday card, she found the idea at Lisa Young's site here.  I added a moon to mine...makes it kinda romantic! 
I used Old Olive CS for the landscape and Soft Suede CS for the card base.  The happy birthday is from the Perfect Punches Stamp Set and punched with the Large Oval Punch and sponged with Soft Suede Ink.  I made the moon by sponging a pice of Very Vanilla CS and punching with the 1-1/4" Round Punch to make a sliver of a moon.  The ribbon is Pear Pizzaz Stitched Poly.  The pick-up is from the Countryside Stamp Set on Water Color Paper and I colored it with pencils and the blender pen.

Saturday, November 27, 2010

More Birthday Cards

Well, here are a few more Birthday Cards ~ one for my Grandaughter who lives in New Hampshire, one for my Step-Daughter who lives in Oceanside and the other for my little Sister who lives in Burson.


Courney's card I used Basic Black CS and Poppy Parade CS cut with the Bigz XL Tasteful Trim Die and run through the Finial Press Embossing Folder .  The stamped flower is from Every Moment Stamp Set stamped with Whisper White Craft Ink and layered on a circle of Poppy Parade CS and then a Scallop Circle out of Very Vanilla CS and sponged with Poppy Parade Ink.  The sentiment is from Teeny Tiny Wishes punched with the Word Window Punch and layered onto Poppy Parade CS punched with the Modern Label Punch.  I added some  Basic Rhinestone Jewels.


The one I created for Holly I found on Stamping School.com last week.  I love how the embossing folder matches the Elegant Sorie'e DSP.  The Happy Birthday is from Perfect Punches Stamp Set, the background Baja Breeze CS was run through the Elegant Lines Embossing Folder with a strip of Crumb Cack CS across and 3 Basic Pearls and more Basic Pearls earls in the deeply embossed Baja Breeze design.  The backing layer is Crumb Cake on a Very Vanilla CS base.  The Happy Birthday is punched with the Large Oval Punch and layered onto Crumb Cake CS punched with the Extra Large Decorative Label  Punch.
                                                                                                                                                                                     
The last one I made for my little Sister using Old Olive CS for the Card Base and Blushing Bride CS punched with the Corner Rounder Punch and run through the Square Lattice Embossing Folder.  I added a strip of the Wide Old Olive Striped Ribbon and with Blushing Bride Stitched Poly Ribbon.  The kitty is from the Every Little Bit Stamp Set layered onto Blushing Bride CS punched with Circle Punch, then a layer of Early Espresso and then the Scallop Circle from Old Olive CS and all layers were sponged with Early Espresso Ink.  The Happy Birthday is from Teeny Tiny Wishes Stamp Set punched with the Word Window Punch and layered on Blushing Bride CS punched with the Modern Label Punch and another layer with the Modern Lable Punch that goes with the Bigz Curly Label Die punched from Early Espresso CS.  I added some Basic Pearls to each side of the Happy Birthday.

Hope they all have Wonderful Birthdays and a year filled with love and family.

Tuesday, November 23, 2010

Kitty Crittermas Notebook

Sorry I've been away ~ we had our trip to Idaho and while we were away I turned my puter off.....well, when we returned, it didn't!  It's been in the hospital for a few days and just got it back today...woo hoo!!!! 

Here's a little notebook I made and took with us on our trip and gave it to our new found daughter ~ she loved it.  I got the idea from Angie Juda's Chic n' Scratch blog, she's so awesome.  I have her as a favorite on the side of my blog, be sure to visit her often.

I used colored pencils and blender pens to color the little kitten that is in the Merry Crittermas Stamp Set.  I used one of the circle punches to cut it out with a scallop circle and the Decorative Label Punch, all sponged with Early Espresso Ink.  The striped paper is from the Jolly Holiday DSP.  Thanks for looking!

Thursday, November 11, 2010

BEST Deal

This is the best deal I've seen since becoming a Stampin' UP! Demonstrator for new Demonstrators to get started.  Help me build a team, join my downline between November 15th & November 30, 2010 for ONLY $87.50!


You can purchse either the Standard or Digital+ Starter Kits at 50% off the regular retail price of $175!  (plus free shipping!), and enjoy these great benefits as a Stampin' UP! Demonstrator:


Earn additional income while sharing creativity.
Make new and lasting friendships.
Receive a free subscription to an exclusive monthly magazine.
Receive two free months subscription to your own business website.
Opporturnity to earn free products and incentive trips.


Go to my website and sign up between November 15th & November 30th.  My password is Johnny8.  If you have any questions, send me an e-mail at Bobnjul@pacbell.net.  Thank you and Happy Stampin'~

Wednesday, November 10, 2010

Gift Card Holder

I found this gift card holder at It's A Stamp Thing, isn't it cute. Check out her blog for instructions.  I used Baja Breeze CS for the base, Candy Cane Christmas Specialty DSP and Real Red Satin Ribbon and CS.  The little button was punched with the Sizzix Die Buttons #5 with Linen Thread tied in the center.  The Very Merry is from the Teeny Tiny Wishes Stamp Set.  The Snowflake is from the Decorative Strip Northern Frost out of Whisper White CS.  You can't see the inside but I punched a half-circle with the 1-3/4" circle punch to make it easier to retrieve the gift card.  I cut the banner free-hand and attached unter the snowflake.  The ribbon is created by using two oval punches, punch the smaller one first and then the bigger one and put all 6 together to form the ribbon.

Candy Wrapper Rudolph

I saw this little candy treat holder on Kay Sha's site Creations on Paper and just had to try and create one!  I used the Candy Wrapper Die for the box and cut the reindeer's face from the Oval Punch and added some googly eyes and the nose is a Basic Pearl Jewel that I colored with the Real Red Marker and put clear embossing powder on and heated.  I used the Old Olive 1-1/4" Striped Grosgrain Ribbon around the middle of the box and the anlers were cut from the Sizzix Die Scribbles Swirls and I just cut off one part of it and glued to the back of his head.  The box is Rich Razzleberry CS.


Tuesday, November 9, 2010

More Birthday Cards

I got a couple more Birthday cards made for my November friends and family.  I think I've done these before, just with different color combinations so I won't go into all the recipes...  Let me know if you have any questions though, I'll gladly share anything you need to know.  I do love the punches for the bird,blossoms, heart and sayings.  The embossing folder for the background makes creating easier too, not to speak of the little jewels and pearls.

Hope the recipients like them.

Happy Stampin'  :o)

Sunday, November 7, 2010

Little Desk

I saw this little desk posted on a blog quite some time ago and printed out the picture.  Today my puter was sick (didn't want to turn on for me) ... so I had time to play instead of surfing all day!!!  Here's my version of what I found on Madeline Morcelo's site The Stamping Studio.  Hope you like it?  I used the Matchbox Die cut for the drawers using Chocolate Chip CS and little brads from the neutrals collection.  The top of the desk is Crumb Cake CS with a layer of Bashful Blue CS.  The desk pad is Crumb Cake CS with Whisper White CS.  The little cup is Chocolate Chip CS wrapped with linen thread and secured with a little Bronze Clip.

Saturday, November 6, 2010

A Sympathy Card

I don't like having to make Sympathy Cards because it means someone that means a lot to me has lost someone they loved very much.  My Step-Niece lost her Mother-in-Law last week and I wanted to let her know that we were thinking of her and her family. 
I used Melon Mambo for the Card Base and the Scallop Edge at the bottom and the Scallop Circle.  The Stampe Sets I used were Upsy Daisy (love that one) and Teeny Tiny Words.  I Used Small Oval Punch and Scallop Oval Punch and some Basic earl Jewels.  The ribbon is Blushing Bride Poly Ribbon and the layer underneath is Blushing Bride CS.  The second layer I ran through the Finial Press Embossing Folder and sponged with Melon Mambo Ink.  I sponged around the Circle and Oval with Melon Mambo Ink also.  I stamped the background using a stamp from the Confetti set (can't see to good in the picture).

Thursday, November 4, 2010

Little Drawer Box

There were instructions this week on Splitcoast Stampers for this cute little box called Santa's Drawers.  I didn't do mine in Christmas, but followed all the instructions and created my own version of a "just for you" set of drawers.  I used Concord Crush CS and the Concord Crush DSP.  The stamps are from Hodgepodge Happiness Stamp Set with Hodgepodge Hardware for the bottom drawer and Antique Brads for the two top pulls.  Concord Crush 1/2" Stitched Poly Ribbon and one of the Rhinestone Jewels for a little bling.  Hope you like it!

Tuesday, November 2, 2010

Wendy's Birthday Card

November is a big Birthday month for us.  Here's the first of several cards I need to get into the mail.
I used Basic Gray CS for the card base and Pink Pirouette CS for the first layer and ran it through the Big Shot using the Perfect Polka Dots Impression Folder on the bottom half.  The Melon Mambo CS was used for the backing on the greeting Birthday Wishes from the Watercolor Trio Stamp Set.  I used the Decorative Label Punch and punched out one White CS and one Melon Mambo CS, cut the white ones in two and made a backing for the Melon Mambo label.  I cut the stamped image out with the Small Oval and sponged with Melon Mambo Ink.  I added 3 Basic Pearls below the greeting.  The flowers on the top are from the Just Believe Stamp Set.  I added Basic Pearls to two of the flowers and I sponged the edge of that with the Melon Mambo ink also.  The Rick-Rack across the center of the card is Melon Mambo CS cut with the Bigz Die Tasteful Trim.  I used more flowers on the inside stamped with Melon Mambo and Basic Gray Ink.  Sure hope Wendy likes her card.  She's in New Hampshire so it has a long way to travel to get to her. 

Sunday, October 24, 2010

Christmas Tissue Box Holder

Did you see the cute tissue box holder tutorial that was posted on Splitcoast Stampers last week .. here's my try at it!  I created a Christmas Tissue Box Holder using Real Red CS for the base, Candy Cane Christmas DSP for the layered panels and the pointsettas and "A Merry Christmas" stamp from the Bells and Boughs Stamp Set.  I sponged all the edges with Early Espresso Classic Ink and added some of the tiny pearls from the Basic Pearls collection to the centers of the flowers. Hope you like it?   


Sunday, October 17, 2010

Sweet Treats

My Sis' Judy made one of these last week and shared with me.  Her's was a tad different, but not much.  The Matchbox cover is made with Clear Shet so you can see the Nuggets wrapped inside.  I used the same paper that Judy did, Autumn Spice DSP, I love the thickness, holds it's shape well when making 3D items.  The labels were sponged with Early Espresso Classic Ink and the sweet treats from Teeny Tiny Wishes Stamp Set was also stamped with the same color on Very Vanilla CS.  The top label was punched with Old Olive CS while the other was the Autumn Spice DSP.  The belly band is Pear Pizzazz Stitched Poly Ribbon.  Thanks for the great idea Judy!

Tuesday, October 5, 2010

Fresh Apples ~ Happy Birthday

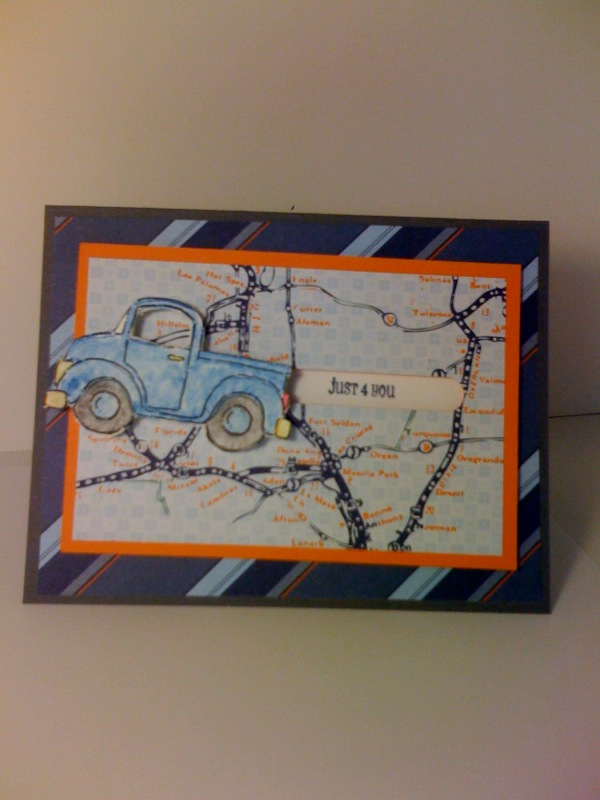
I love this little pick-up.  I saw a card that Dawn did on her blog  Dawn's Stamping Thoughts  and used that as my idea for making this one.  Her's is done with a little darker colors and different ribbon, but basically they're the same.  I used Countryside for the pick-up truck, stamped with Staz-On Black Ink and colored with colored pencils using the blender pen.  The card base is Soft Suede and then I ran the next layer of Crumb Cake through the Finial Press Embossing Folder.  I layered the little truck on another piece of Soft Suede, punched the corners with the Ticket Corner Punch and sponged with Soft Suede Ink.  The Happy Birthday is from the Teeny Tiny Wishes Stamp Set stamped in Soft Suede on Water Color Paper.  The Brads are from Glimmer Basics Set.  I used some Victorian Ribbon and the newspaper looking layer is from Newsprint DSP.  I punched the Happy Birthday with the Word Window Punch, sponged it with Soft Suede and layered onto Soft Suede Paper punched from the Modern Label Punch.

Sunday, October 3, 2010

A Friend's Birthday

A friend is having her Birthday this week so I created a floral arrangement for her and a Birthday Card to go with it.


Hope she likes them!  The card base is Chocolate Chip and a layer of Autumn Spice DSP.   The stamped flower on water color paper is from the Every Moment Stamp Set and the Birthday Wishes is from the Watercolor Trio Stamp Set.  I sponged the edges with Early Espresso and punched the Birthday Wishes with the Small Oval Punch and layered onto a piece of Pumpkin Pie CS punched with the Scallop Oval Punch. I did the corners with the Ticket Corner Punch and added some flat back pearls.

Wednesday, September 29, 2010

Totally Totebag

                    
 I made one of the little Totally Totebags they gave instructions for on Splitcoast Stampers today.  Isn't it cute?  I used Autumn Spice DSP for mine.  Some of the new Antique Brads to hold the handles and Brass Brads for the sides and the little clasp (those were from the Hodgepodge Hardware Antique Brass ~ I think those are retired now).   I sponged all the edges with Soft Suede Ink.

Check out their site, not only do they provide you with a template, but there are written instructions and a video!  Can't beat that.....

Happy Stampin'

Monday, September 27, 2010

Little Gift Box and Gift Card Holder

I saw this on Angie Juda's U-Stream this week-end, aren't these cute?  She gives you hands-on instruction.  It's so awesome.  This year's Christmas colors are fun!


The Stamp Set is Greeting Card Kids and the base paper is Crumb Cake CS.  The striped paper is the Elegant Soiree DSP.  I sponged all the edges with Soft Suede Ink.  The square behind the image is Basic Black CS.  We used a little Dazzling Diamonds to make it sparkle (on the star and the fur on her coat).  The button on the front of the box is one of the new Antique Brads.  I also used the Eyelet Border Punch using Baja Breeze CS.  Hope you like it.  Big hugs, Julia

Sunday, September 26, 2010

Theresa Welcome!

We had a call of a "lifetime" on Tuesday, September 21, 2010.  My husband got home from golfing to a message left by his Daughter Theresa, who he had long ago felt like he would never have the opportunity to know.  She was born while he was in the Army, he once had a small picture of her but says it was misplaced many, many years ago (to his dismay).  I created a card through the awesome Stampin' UP! MDS to announce her arrival into our family.  Bob and I can hardly wait to meet her and her family in person.  God is great, God is good. 
I used some of the Pretty In Pink Satin Ribbon and layered onto  Basic Black CS.

Please join our excitement of welcoming Theresa into our family.

Wednesday, September 22, 2010

Spooky Halloween Box

Here's a little box I made using the new Wicked Fun DSP.  I cased the instructions from Angie Juda at Chic n Scratch's Ustream demonstration.  That lady is so creative.  The only thing I added that she didn't is the Pear Pizzazz Stitched-Poly Ribbon around the Basic Black CS belly band.  I did sponge some Pear Pizzazz ink around the edge of ivory cs that I stamped using the Wicked Cool Stamp Set.  I stamped the shoes with Rich Razzleberry ink and used the Stampin' Write Pear Pizzazz marker on her socks.  I punched the little bat with the new bat punch and sprayed him with Champagne Mist mixed with alcohol.  Can't see it in the picture, but it makes it nice and sparkly (is that a word?)..

Halloween isn't one of my favorite holidays, but the treat boxes and goodies are fun to create! 

Keep Stampin'
Julia

Monday, September 20, 2010

Halloween Card and Purse Card

I made a card and a little purse card yesterday ~ for the card I use water color paper for the stamping.  The Spooky is from the stamp set Wicked Cool and the bird is from Dark & Dreary.  I got the spider from Dark & Dreary and the spider's web from Wicked Cool!  I tried to antique it after stamping onto water color paper.  I used Early Espresso Classic and Soft Suede Ink.  The background paper is Wicked Fun Specialty DSP and I used the Victorian Ribbon and flat back pearls.  The card purse I cased from Inking Idaho.  I used the Wicked Cool Stamp set for the shoes and the leaf and stem are from the Two Step Bird Punch.  The paper is again from the Wicked Fun Specialty DSP and Basic Black CS.  The little purse closure is one of the new antique brads.  I also used some of the Chantilly Ribbon on the handle that was punched from the Scallop Oval Sizzix Die.

Sunday, September 19, 2010

For You!

I made a card that I cased from Shelley Long.  I love the blues and green together.  I used Baja Breeze CS with the scallop trim border punch.  The heart, blossoms and bird are from the Hostess Stamp Set Punch Potpourri stamped in Pear Pizzazz and punched with their coordinating punches/ Boho Blossom, Two-Step Bird and Full Heart Extra Large.  This was all layered onto Whisper White CS that I ran through the Vintage Wallpaper Textured Impressions Embossing Folder and layered onto another piece of Pear Pizzazz CS  and I used 1/2" Pear Pizzazz Stitched-Poly Ribbon and then a Card Base of Whispter White.  I embelished with the rhinestones and the for you was stamped in Baja Breeze (it's from the Elements of Style Stamp Set).  Hope you like it!

Saturday, September 18, 2010

Spooky!

Here's a 4x4 card I created after seeing what my friend Tina made at her latest Club get-together. Not exactly the same, but close! Thanks for sharing Tina.

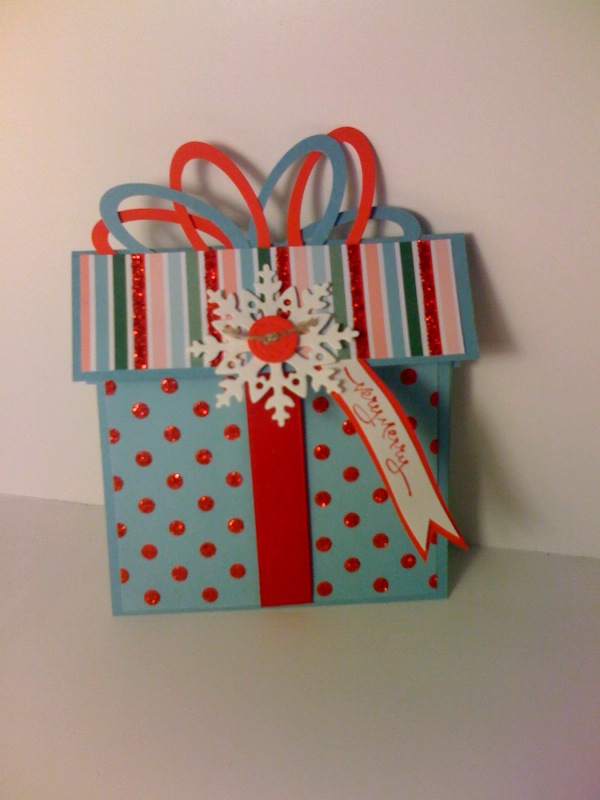
I used Basic Black CS for the base card, stamps from the Wicked Cool Stamp Set, Black Satin Ribbon, a little Binder Clib, some Rich Razzleberry for the sponging and a bat punched with the new Bat Punch and sprayed with Champagne Mist Shimmer Paint mixed with alcohol. I stamped Spooky on Very Vanilla CS and layered onto Black CS punched with the Scallop Oval Punch and mounted with dimensionals. The green layer is Old Olive CS.

Tuesday, September 7, 2010

Suitcase


Isn't this the cutest little suitcase? I found it at Suzanne J Dean's site, ScrapBitz Designs. I used Concord Crush CS for the case and Concord Crush Stitched Poly Ribbon for the bands around the case. I ran Soft Suede CS through the Finial Press Embossing Folder for the sides and use Crumb Cake sponged with Early Espresso for the reinforcements on the corners of the bag. I added flat back pearls to the ribbon and the little bus is stamped on Crumb Cake CS (it's from the Every Little Bit Stamp Set).


Monday, September 6, 2010

Shadow Box


I found this shadow box tutorial on Sharon Field's site. Not sure the picture does it justice, but it comes out soooOOO cute. I used the Just Believe Stamp Set along with a butterfly punched from the Sizzlets die Embosslits Beautiful Wings. Added some Linen Thread for it's body and tenicles. I also used the Square Scallop Clear Sizzix Die for the window and inside piece of Very Vanilla CS. I used some flowers from the Pretties Kit that I sponged and colored with the Pacific Point Classic Stamp Pad and Marker. The center of the flower is a brad from the new Antique Brads. The window is Clear Sheets and check Sharon's site above for a step-by-step tutorial. Can't see the stand in the picture but she also gives instructions for an easel stand to make the box stand up. Very cool!

Sunday, September 5, 2010

Birthday Card


Another year! I made this Birthday Card the same as one I did earlier, except I used the Early Espresso to sponge the edges of the water color paper. I used the Perfect Polka Dots Impression Folder. The stamp is from The Nicest Things Stamp Set and the Happy Birthday is from the Perfect Punches Stamp Set. I cut it out with the Large Oval Punch and sponged the edges. I mounted it with deminsionals and put some of the new pearls in the corners that were punched with the Ticket Corner Punch. It's layered onto a card base of Pink Pirouette CS.

Wednesday, September 1, 2010

I'm batty for you!


Here's a cute little Halloween creations that encourages hand cleaning ... the little bottle inside is hand santitizer! This idea came from Pink Buckaroo Designs. What a cute idea. I used Old Olive CS for the container holder, Batty For You Stamp Set for the Owl, Circle punches along with Scallop Circle Punch. The paper is from Jolly Holiday DSP (amazing how Christmas DSP can subsitute for Halloween?)... Black Satin Ribbon, Large Oval Punch, Dimensionals... check her site for the tutorial. Also check my friend Tina's site for her version ~ great job Tina!!!


Sunday, August 29, 2010

School Kids


I found this card at CardScraps and had to case it! I just loved the colors she used. The card base is Crumb Cake CS, then a layer of Basic Black CS, Real Red CS for layering and the new Love Letter DSP. Of course sponged with Early Espresso and the ribbon is the Black Satin. I think it gives it a real vintage look. The stamp is from the Greeting Card Kids Stamp Set. I colored mine with Stampin' UP! markers and the Blender Pen.

Wednesday, August 25, 2010

Happy Halloween Greeting Card Kid

I'm lovin' this cute little stamp set called Greeting Card Kids (they look like the old Campbell Soup Company Kids)! I snagged this idea from Angie Juda at Chic n' Scratch, isn't it cute. She's so awesome. She's doing live videos and you can go back and view them later if you miss the actual live showing. I love how she takes us right into her craft room, check it out.


I used Old Olive CS for the box and the wide striped grosgrain ribbon in Old Olive. I also ran a strip of Old Olive Grosgrain Ribbon down the side. The background paper is Pawsitively Prints DSP. I stamped the little girl on her pumpkin from the Greeting Card Kids and punched it out with the new 2-1/2" Circle Punch and sponged the edges with Early Espresso Classic Ink. The happy halloween is from the Teeny Tiny Wishes Stamp Set stamped on Whisper White CS and punched out with the Word Window Punch and of course, sponged with Early Espresso Ink. I think my friend Tina has gotten me into the Halloween spirit!!!

Monday, August 23, 2010

Sister Birthday

One of my little sisters is having a Birthday this week ~ here's the card I made for her. Should have had it in the mail already ~ at least I'll get it going before her BIG DAY!!!
I used the Aviary Stamp Set for the birds and cage. I stamped the bird cage on clear acetate and cut it out and mounted it over the little bird that's statmped directly onto the background paper, the top is Elegant Soiree DSP and the bottom part of the card is from Travel Journal DSP. I punched the happy birthday with the large oval punch. The happy birthday is stamped with the Perfect Punches Set on Baja Breeze CS. I sponged around the outside edge with Early Espresso and rounded the corners. The ribbon across the center is Pumpkin Pie Grosgrain. Sure hope she likes the card and the thought ~ I know she will. I did the inside on my computer and added another long-legged bird from the Aviary Stamp Set. Happy Birthday Sis'! It's really hard when they live so far away ~ well, not real far, but over 4 hours, so I don't get to see her and her family very often. I know Judy ~ at least it's not Michigan!

Sunday, August 22, 2010

Halloween Mojo!

I borrowed this picture from my dear friend Tina's blog Lemondrops Simple Stuff. She had a Stampin' UP! workshop at her home for me yesterday. We had so much fun and the girls all did a fantastic job of creating!


Tina is a perfect little hostess. She made lemondade, salami roll-ups/olives, watermelon and the best cookies ever!

We created the Peppermit Patty scallop circle with the spider, little tubes of M&M's with the scallop at the top and another halloween stamp and the milk carton with halloween motif (filled with yummy fall pumpkins and candy corn) and then a little 3x3 card with the new owl punch! Tina's favorite holiday is Halloween so I hope we gave her a lot of inspiration to get going for her festivities this year (her pumpkin plants that she's growing in the backyard are starting to get pumpkins on them so it's getting closer). Thanks Tina ~ you're a great friend and an awesome hostess.

Monday, August 16, 2010

Joy at Christmas Notebook


I cased this from Chic n Scratch, almost the same, just different! I used some little subject notebooks and layered Poppy Parade CS, then Jolly Holiday DSP with a strip of Pear Pizzazz CS punched with the Dotted Scallop Ribbon Border Punch. I used the Stamp from Perfect Punches, stamped once in Pear Pizzazz and again with Poppy Parade Stampin' Pads. I punched them out with the Scallop Circle Punch and the 1-3/8" Circle Punch and layered them on with Dimensionals. I added a little ribbon on the side made with Old Olive Grosgrain Ribbon. Never to early for Christmas!!!

Saturday, August 7, 2010

Jordan Elijah


A lady at my work sent me a picture of her Grandson. This is the card I made as a thank you to her for sharing her little bundle of love!
I used my digital STUDIO for the background and added a few embellishments. The "In My Thoughts 24***7" is from the Hodgepodge Happiness Stamp Set. I punched it with the 3/4" Circle Punch and mounted it onto the heart with a deminsional. I used a brad from the Filigree set in the center of the Baby Blue ribbon. I punched the bottom with the Scallop Trim Border punch. I ran some Soft Suede CS through the Perfect Polka Dots Impression Folder and used the snail to mount it to the back and then all of it onto Pumpkin Pie CS and then a card base of Soft Suede CS. I added 3 little rhinestones from the Jewels Basic Rhinestone pack. Hope she likes her card?

Sunday, August 1, 2010

Cased another card ~ hello baby!

This lady (Jackie Topa) is awesome ~ she did a video tutorial on this card. Check out her blog; Addicted to Stamping and see what I mean!


I pretty much followed her instructions. I used the Whisper White for my Base Card and sponged with Pink Pirouette. I used the little Sizzlet Lil' Paws for my bear and sponged him with Soft Suede. The stamp set I used for the Onesie is the stamp wheel Baby Tees. I used the Word Window Punch for the post the hanger (made from a paper clip) is hanging on. I used the Pinking Hearts Border Punch, Paper Crimper, Ticket Corner Punch on the drawers and Curly Label Punch for the bottom of the dresser.

Thanks for looking! Happy Stampin'

Thursday, July 29, 2010

Spinner Truck Card


I found this card on Card Scraps blog. The little truck spins across the open window. I used the Loads of Love Stamp Set and the Travel Journal DSP. The window is cut with the Word Window Punch and layered onto Pumpkin Pie CS, more Travel Journal CS and then a base card of Gray from the Neutrals CS collection.

Wednesday, July 28, 2010

Butterfly Thank You

I used the cracked glass technique to create my butterfly ~ don't you just love it? I stamped Whisper White CS with the Elements of Style Stamp and put on two coats of the thick embossing powder, put it in the freezer for about 10 minutes and took it out and cracked the coating. I used the Soft Suede and sponged over the entire surface and then wiped out so the cracks would show up better. I mounted it on Not Quite Navy CS that had been run through the Square Lattice Impressions Folder and then mounted that onto some Pear Pazazz CS and then onto a card base of Very Vanilla CS. The thank you is from the Because I Care Stamp Set stamped in Soft Suede Ink and layered onto the oval of Pear Pazazz and the scallop oval punched from the Soft Suede CS. Hope you like it. Oh yeah, the center and tenicles of the butterfly are done with the linen thread.


Tuesday, July 27, 2010

Another fabulous friend creation!


Wow, my BFF's are really gettin' into stampin' and creating. This is what my friend in Bakersfield created for her co-worker with a little help from an enabler (that would be me)! She did an awsome job and her co-worker was totally blown away!!! Way to go Kerry ~ Happy Birthday Cindy!


These little purses come out so cute and with the directions from Card Scraps, it's pretty easy to create.


Monday, July 26, 2010

I received the cutest card!

My friend came to my house a couple of weeks ago to check out my craft room and learn a couple of things about stamping. She did so good, I'm so proud of her. And look what I received from her today ~ she's totally AWESOME! Thanks Dawn.

I think she's gonna make a great stamper! She's coming to my next workshop that my dear friend Tina has scheduled for me in August and she's so excited. I can hardly wait for the two of them to meet ~ I know they're going to hit it off like long-lost friends! Isn't it amazing how stamping can open up a whole world of friendships. I love it! And Judy (my Twin) has been nominated to make sure Dawn is comfortable at the workshop and doesn't get to overwhelmed with Stampin' UP! creations. To much fun!!!

Sunday, July 25, 2010

just for you Kitty!

How cute is this little guy. I made the flower using Cindee Wilkinson's instructions on Just Sponge It. Judy told me about it and I couldn't wait to try one. I had made this card and it needed a little somethin' so the flower was perfect to finish it off! The card base is River Rock CS, then a layer of Soft Suede. The printed layers are from Elegant Soiree DSP. I used Paper Crimper for the River Rock across the bottom and ran a strip of Bashful Blue Satin Ribbon across the upper center. The flower is Baja Breeze CS and I ran that through the Square Lattice Impressions Folder. I used one of the 5/8" neutral brads for the center. The just for you is from the Just Believe Stamp Set. Sorry but the little kitty's whiskers kinda look like they got burned off! Poor little guy?? His belly is full of the new Pretzel M&M's, so he's happy! I added google eyes and his tail is punched with the 2-Step Bird Punch and then snipping off all but the last leaf.

Tuesday, July 20, 2010

My Baby Buggy


I found this on-line by Sandi MacIver . She said it isn't her original idea but she does give all the directions on how to make it. She couldn't remember where she originally found it (sorry). You use the Large Sizzix Circle Scallop Die, (I used Bashful Blue CS) the Perfect Polka Dots Impression Folder. Whisper White CS punched with the Eyelet Border Punch. Use the 1-1/4" circle punch along with the 1/2" circle punch to make the wheels and the spinner on the hood of the carriage. A couple of brads from the Hodgepodge Hardware Kit and that's it. Check out Sandi's site for all the instructions. Thanks Sandi!

Sunday, July 18, 2010

Little Garden Pump & Wooden Barrel


I love this stamp from the Countryside Stamp Set. I did a little 3x3 card and colored with color pencils using the blender pen (which I'm lovin')....background card base is Crumb Cake CS layered with Basic Black CS and then Soft Suede CS layer ran through the Big Shot and the Square Lattice Embossing Folder. I used the new 2-3/8" Scallop Circle Punch and sponged the outside with Soft Suede Ink and punched little holes around the circle and punched with the retired Horizontal Slot Punch and put some of the new 5/8" Victoria Ribbon.